In system program the UEFI BIOS
Apart from looking so crude: This device actually worked! I was able to
re-flash the UEFI BIOS directly on the motherboard and the computer
starts again! More important is though, that after that worked, there is
no reason to NOT further play around with the BIOS anymore. Watch out
for news or try it on your own. An interesting low-level world has
forgotten to lock its gate ;)
 The whole story: I faced a serious issue with my computer the other day,
when it wasn't booting any more and stuck on the BIOS logo screen. I
tried DEL and the F* keys, but the system did not respond by any means.
But I further noticed, that -within a certain time frame- the NUM lock
key worked with a remarkable delay before the LED reacted. I removed all
components, even one of the two RAM sticks I have- still the same thing.
Since the board had a dual bios, I tried to re-flesh the first from the
second by holding the on switch for a few seconds. Although that seemed
to work it did not fix the issue. I removed and reinserted the bios
battery and started bridging pins of the BIOS chip in order to erase it
until I managed to get the computer in an even worse state in which it
turned on and again off very quickly without showing anything on the
screen. I managed to destroy my BIOS and that used to be something for
which you have send your board back to its manufacturer or buy a new
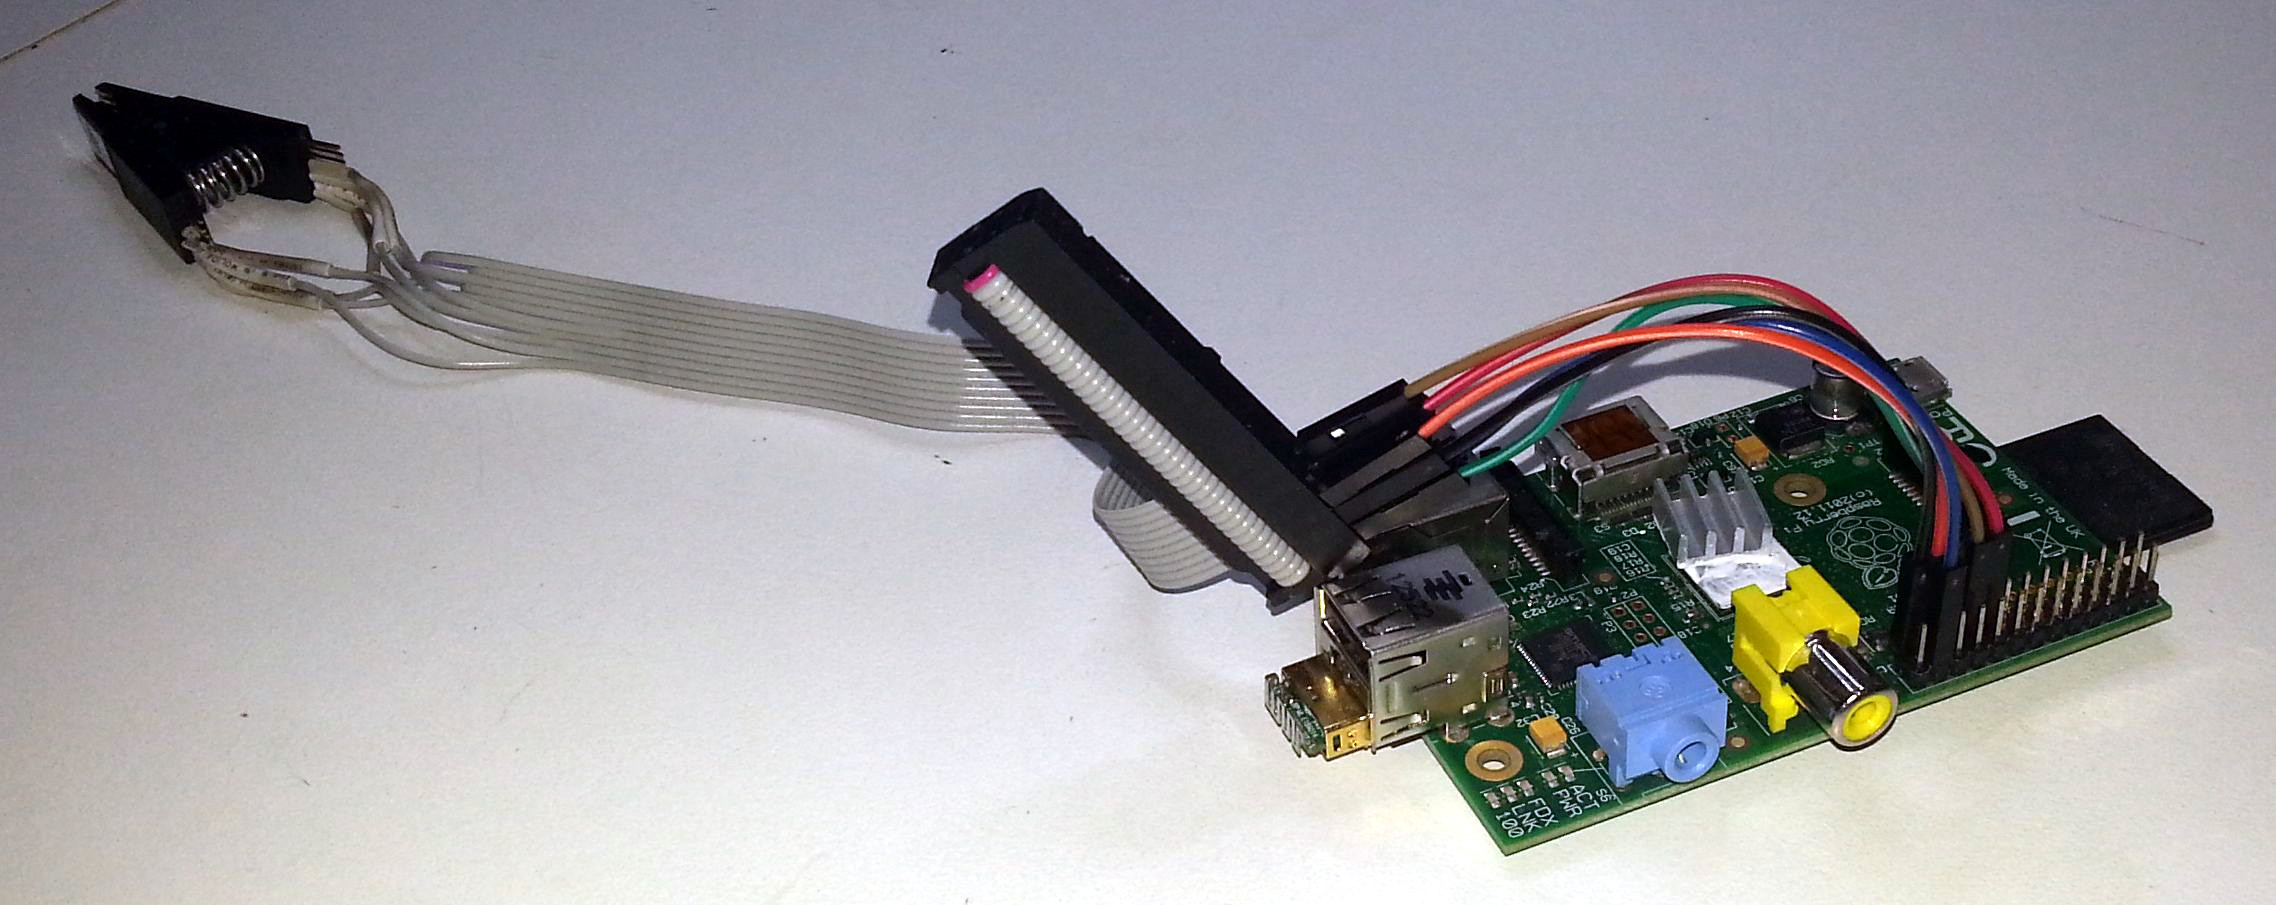
one. But I was still not ready to give up on it and after some soldering
and bug fixing I came up with a really crude solution, which I now want
to share with you, because this thing looks so terrible, even though it
worked :D Note: I also tried a direct connection with a more recent
Raspberry Pi 3, but for that additional resistors would be required.
The whole story: I faced a serious issue with my computer the other day,
when it wasn't booting any more and stuck on the BIOS logo screen. I
tried DEL and the F* keys, but the system did not respond by any means.
But I further noticed, that -within a certain time frame- the NUM lock
key worked with a remarkable delay before the LED reacted. I removed all
components, even one of the two RAM sticks I have- still the same thing.
Since the board had a dual bios, I tried to re-flesh the first from the
second by holding the on switch for a few seconds. Although that seemed
to work it did not fix the issue. I removed and reinserted the bios
battery and started bridging pins of the BIOS chip in order to erase it
until I managed to get the computer in an even worse state in which it
turned on and again off very quickly without showing anything on the
screen. I managed to destroy my BIOS and that used to be something for
which you have send your board back to its manufacturer or buy a new
one. But I was still not ready to give up on it and after some soldering
and bug fixing I came up with a really crude solution, which I now want
to share with you, because this thing looks so terrible, even though it
worked :D Note: I also tried a direct connection with a more recent
Raspberry Pi 3, but for that additional resistors would be required.
Here is my bash history from a debian* based octopi image #
modprobe spi_bcm2835
modprobe spidev
git clone https://github.com/flashrom/flashrom.git
cd flashrom/
ls -l
make
apt-get install build-essential pciutils usbutils libpci-dev libusb-dev libftdi1 libftdi-dev zlib1g-dev subversion libusb-1.0-0-dev
make
./flashrom
reboot
flashrom -p linux_spi:dev=/dev/spidev0.0,spispeed=1000
cd flashrom/
./flashrom -p linux_spi:dev=/dev/spidev0.0,spispeed=1000
./flashrom -c "MX25L3205D/MX25L3208D" -p linux_spi:dev=/dev/spidev0.0 -r MX25L3205D-MX25L3208D.rom
ls -l MX25L3205D-MX25L3208D.rom
apt-get  install hexedit
./flashrom -c "MX25L3205D/MX25L3208D" -p linux_spi:dev=/dev/spidev0.0 -r MX25L3205D-MX25L3208D-02.rom
md5sum MX25L3205D-MX25L3208D*
./flashrom -c "MX25L3205D/MX25L3208D" -p linux_spi:dev=/dev/spidev0.0 -r MX25L3205D-MX25L3208D-03.rom
md5sum MX25L3205D-MX25L3208D*
./flashrom -c "MX25L3205D/MX25L3208D" -p linux_spi:dev=/dev/spidev0.0 -w /home/pi/repair_anubis/H61MAD3V.F7c
./flashrom -c "MX25L3205D/MX25L3208D" -p linux_spi:dev=/dev/spidev0.0 -r MX25L3205D-MX25L3208D-F7c.rom
md5sum MX25L3205D-MX25L3208D-F7c.rom /home/pi/repair_anubis/H61MAD3V.F7c
sync
poweroff